
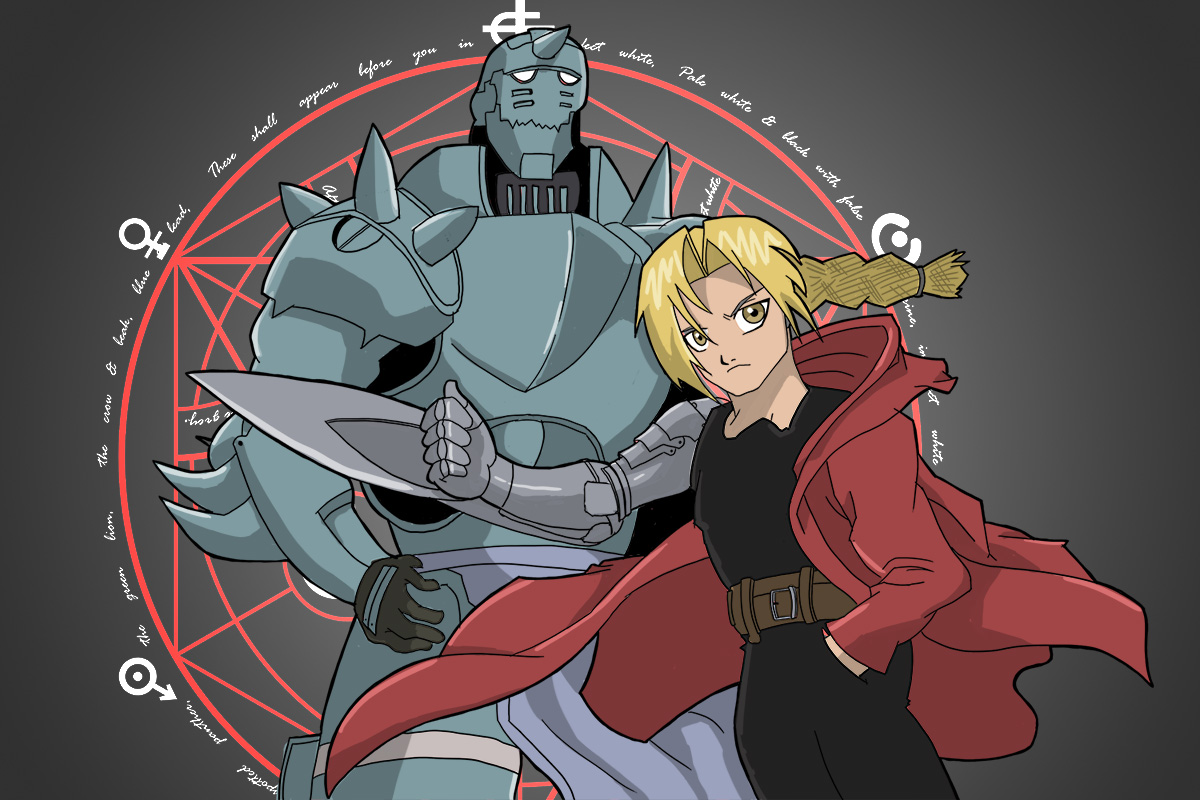
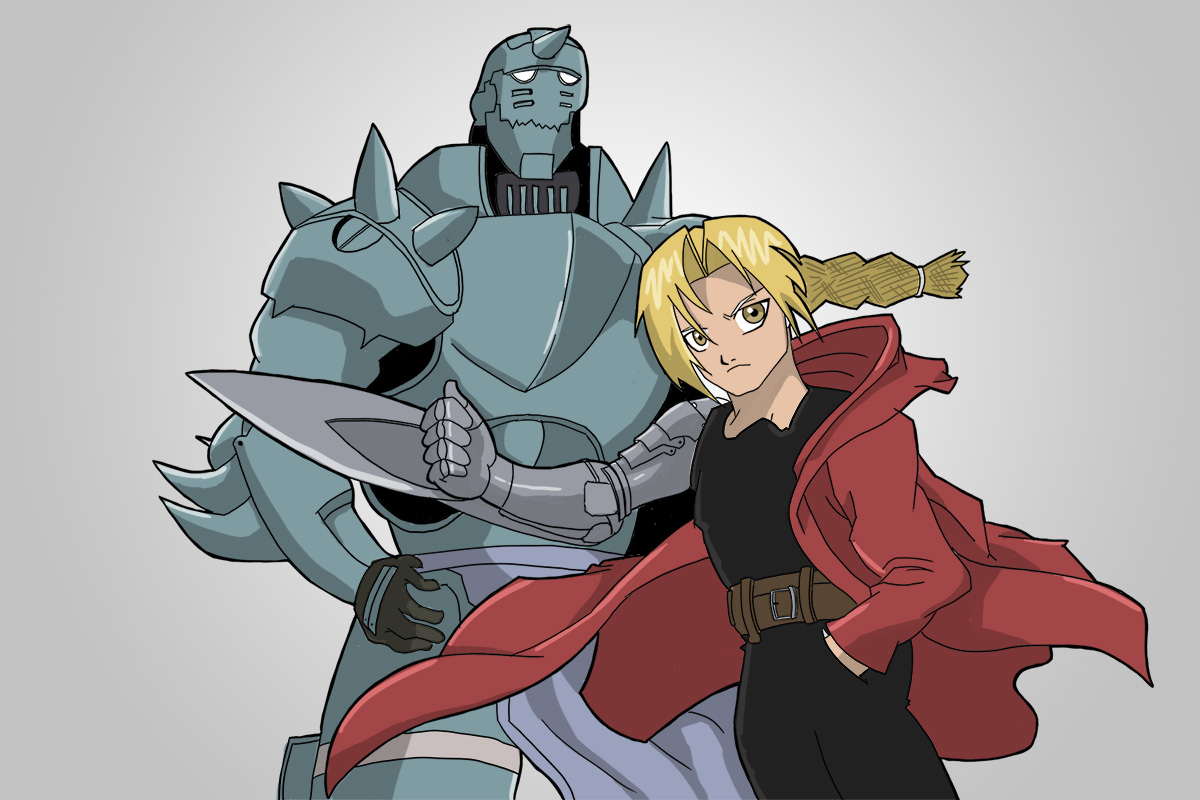
As you would know by now we’ve recently just announce the results for the January Drawsome! which had the epic theme of Favorite Anime & Manga Characters. You might also know that I decided to draw FullMetal Alchemist and I can’t explain how much fun that was. This month I wanted to learn how to cell shade using a new technique as I found my previous process for shading to be clunky and also exploded my files with unnecessary amounts of layers.
If you want to learn more about how to cell shade then make sure you head over to the Wikipedia page for a nice definition and example of exactly what I mean when I use the term cell shading.
How To Cell Shade The Wrong Way
My previous approach to cell shading had been to place my flat colors on individual layers then create two new layers for each flat color. One layer would be for the shadows and one for the highlights. I generally picked a color that was either lighter or darker than my flat color. As you can tell however this can quickly become a mess because the amount of layers you have can explode quickly.
Note: Although you can group layers together, into folders, I still found the process to be messy and confusing
The second issue I had, when using the approach above, was that I’d set each shadow and highlight layer as a clipping mask so that my shading wouldn’t escape, or bleed, out of the flat colors. Therefore shadows that continued across flat colors, for example a shirt and trousers, would be on different layers. This meant that you’d lose something of the flow of your cell shading and at times it could cause strange affects between objects.
How To Cell Shade The Right Way
Now with everything there is always a number of ways you can achieve different techniques. There isn’t really a right or wrong way when it comes to art, it’s simply what works best for you. So don’t look at this method as the only way when learning how to cell shade. This cell shading method is simply the way I find works best for me but it’s not to say I won’t change again in the future.
Firstly with the FullMetal Alchemist artwork I created Edward and Alphonse on separate layers. This allowed me to focus on one character at a time and take some of the clutter out of my screen. Secondly if I stuffed up one character I hopefully wouldn’t affect the other one at all.
The first part of the process is to add your flat colors for a character to a single layer. I’ve explained how I add my flat colors using numerous tutorials in the past so if you’d like to find out more check out my How To Draw Cloud Strife tutorial. This is where my process changes because now that I have my flats on a single layer I created one new layer for shadows and one for highlights and created a clipping mask layer.
Basically color theory says that If you add black to a color then it will become darker i.e a shadow and if you add white to a color it becomes lighter i.e a highlight. So this is all I’m doing add pure white and pure black to my shadow and highlight layers. The trick however is to use Photoshop layer modes, Multiply mode for shadows and Overlay mode for highlights. Then we simply have to drop the opacity of our layer to blend it with our colors. Let’s see an example
Note, if you’re using pure white and pure black then you may find that simply reducing the opacity provides you with a similar affect. If you want a more comprehensive guide on Photoshop layer modes then check out this tutorial
How To Cell Shade – Step 1 Add Flat Colors
-cell-shade-fullmetal-alchemist-flat-colors
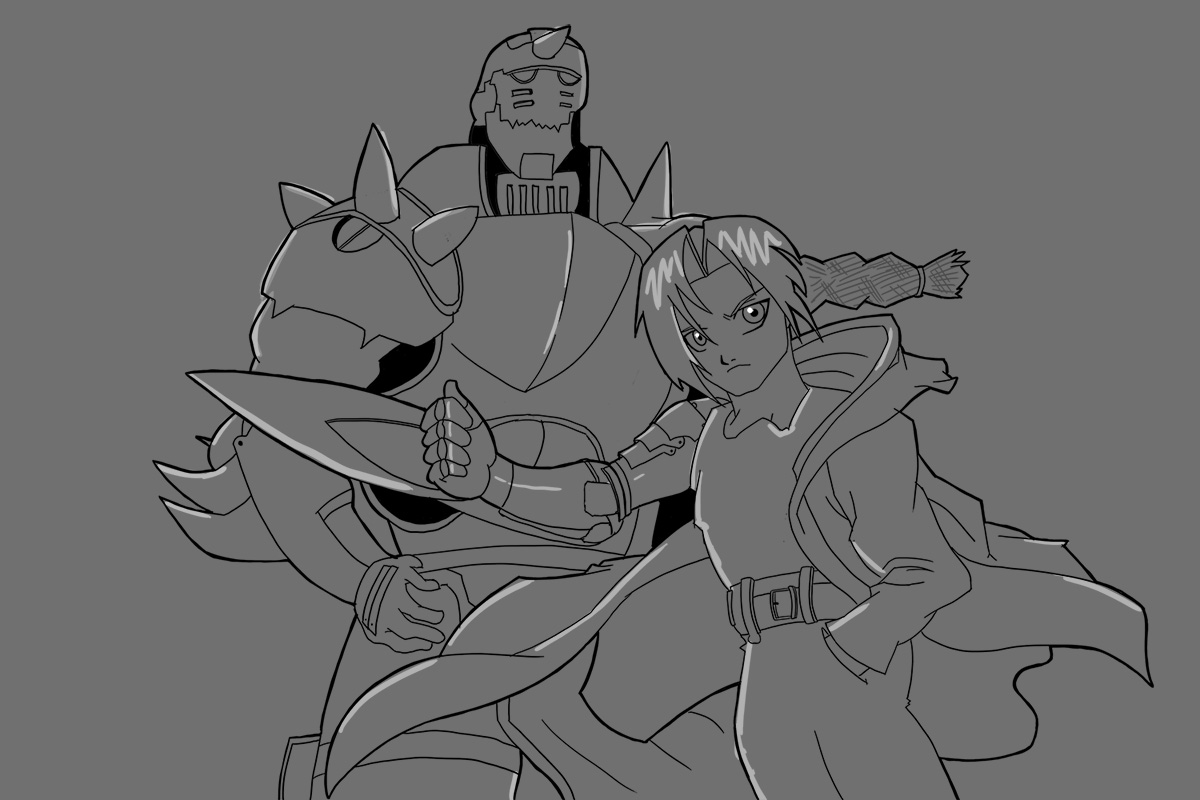
How To Cell Shade – Step 2 Add Shadows
When you create your shadow layer you need to remember to switch the layer mode to Multiply. However if you’re using 100% Black then it’s not so important, you could simply use the normal blending mode and switch the opacity for a similar effect. You can use either the Lasso tool or you can just paint them in freehand as I’ve done in this example.
Don’t worry if your color is black and it’s painting over the top of your artwork, you can simply set the layer opacity between 20% and 40% so that your black will become a shadow of your flat color.
When it comes to Multiply Mode in Photoshop this is basically what happens
- Anything White completely disappears
- Anything Black remains black
- Everything else becomes darker.
I’m still experimenting with the affects however so let me know what you think of different modes in the comments below.
how-to-cell-shade-fullmetal-alchemist-shadows
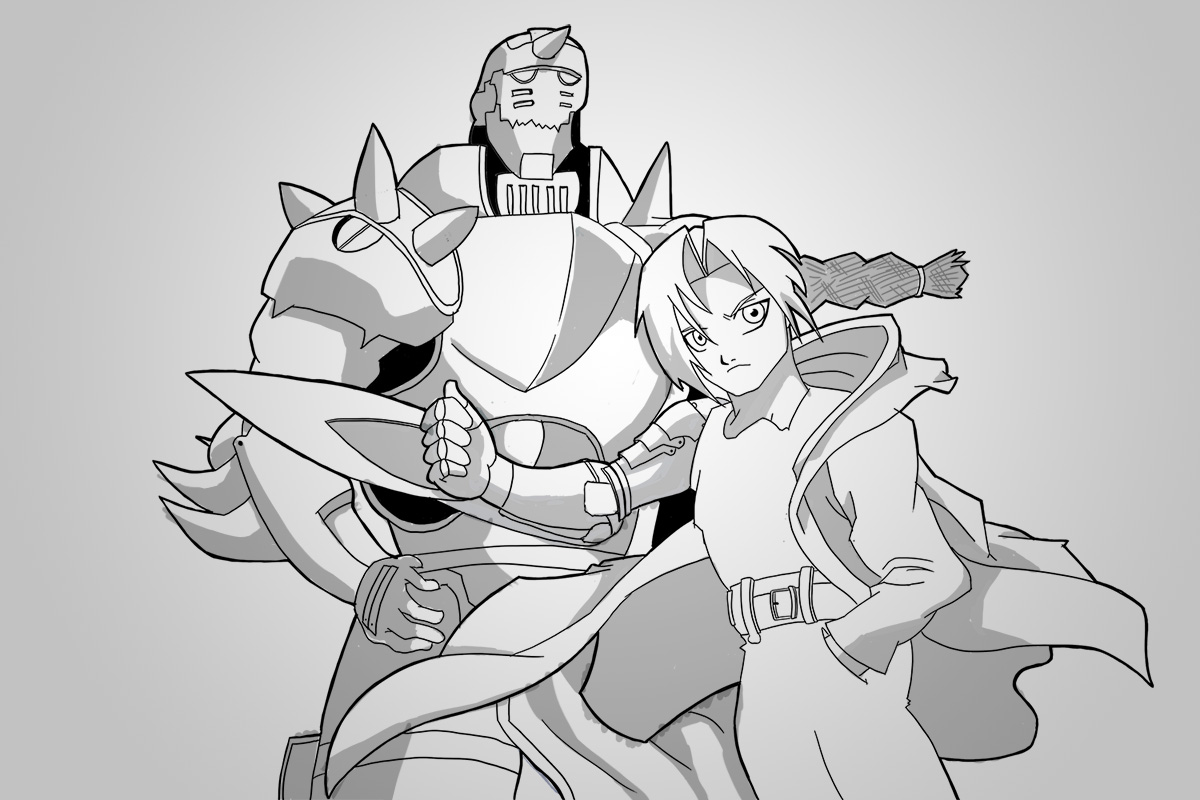
How To Cell Shade – Step 3 Add Highlights
The second step is create another a new layer and this time call it highlights. You can use pure white and add the highlights to the areas you wish. Once again set the layer opacity between 20-40% to create your desired highlight effect.
The Overlay blend mode both multiplies dark areas and screens light areas at the same time, so dark areas become darker and light areas become lighter.
how-to-cell-shade-fullmetal-alchemist-highlights
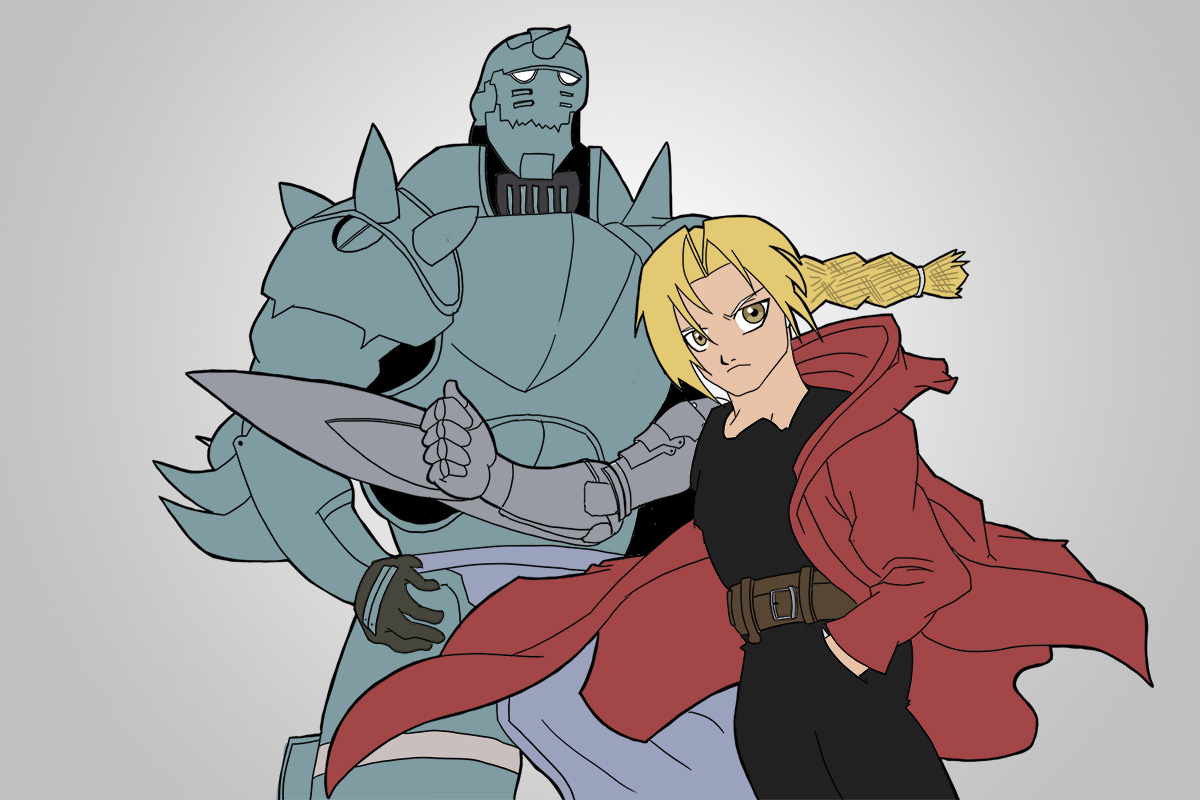
How to Cell Shade – The Final Step
The final step in learning how to cell shade is to simply combine all of three images above, or layers in PS as they will be for you, but the chances are that you will have already done that in your process by now. For the tutorial purposes I’ve broken down each step and showed you each layer so you can see exactly what I mean.
For you however you’ll simply see your artwork coming to life with highlights and shadows over the top of your flat colors while you’re working.
how-to-cell-shade-fullmetal-alchemist_final
Let’s Finish Up
So that’s all there is to it, I find this a better way to shade and color my drawings. If you’re interested in seeing a video on how I do this then please check out the following video on How To Draw Chris from Family guy and watch for the prompts in the video to show you what I’m doing. If you want to go back to my earlier videos you’ll notice my old method for doing my shading.
Again, this is simply a method I’ve found that works better for my artwork. Everybody has a different method however and I’d love to hear your thoughts on your own coloring and how your simplify your process when it comes to cell shading.
Let me know what method works best for you in the comments below.
Thanks for these tips, they are really interesting! I do have one question though, you do both layers above the flat color layer, right?
That’s correct Jake, Flat colors first and then new layers come over the top. Then you reduce the opacity so that you can see through to your flat layers. Hope this helps
It does indeed, thanks 🙂 For a darker color sometimes I draw underneath in say a very deep blue, and then multiply the flat color layer so that the one dark blends from underneath with all the others as a gradient or deep shadow, you can get some intriguing effects that way!
Interesting Jake, thanks for sharing I’ll have to give that a go. I need to practice more on what colors work best for multiply and why you’d choose one color over another. There are some good tutorials on Deviant Art from artists I’ve seen so I’ll need to study them more closely.
BLENDING. I never even thought of that.
What I’ve been doing is choosing the shadow tone from the colour palette, then basically painting the shadows in. But I always wondered by my shadows looked too sharp and blocky compared to others who had more soft, natural edges to their shadows and highlights.
I’m gonna try this one next time I sketch!
Hi Rachel! Sometimes using the lasso tool and holding the shift key for each selection you make can make your shadows look a bit more natural and not so shakey from your own hands. It depends on what your shading however. Try just shading with black on a new layer and then changing the opacity down to 20-30%.