
Have you ever attempted drawing anime eyes for your favorite anime character, or any character for that fact, and it just didn’t turn out the way you’d hoped it would? Do you feel like the character was drawn well and the perspective was correct but “#sigh”, something is still missing! Well there are a few reasons for that and one major reason is when it comes to drawing anime eyes is that you may have missed some key elements that will really help bring your character to life.
Drawing anime eyes can be tough, especially when you’re a beginner, but once you learn some of the key tips and tricks you’ll be amazed at how much life you can breath into your character. The eyes and the face are the first thing people look so why not spend the time to make them look totally kick ass!
Firstly, you don’t have to draw eyes from memory, it’s totally OK to find a reference image when you’re drawing anime eyes. Even if you’re drawing your own character, that you’ve created yourself, you can still find reference images from your favorite characters and use those as the basis for your own drawing. This doesn’t mean you trace the eye but merely you observe it and use it to assist you when sketching out your own version.
Originally when I created the eyes for this tutorial I had aimed to tell you how to draw all four of them in one blog post. However I felt that this wouldn’t do any justice to the other three eyes that I want to talk to you about too. So I’ve decided to split them out into individual blog posts and I’ll get them out to you throughout the next week or two.
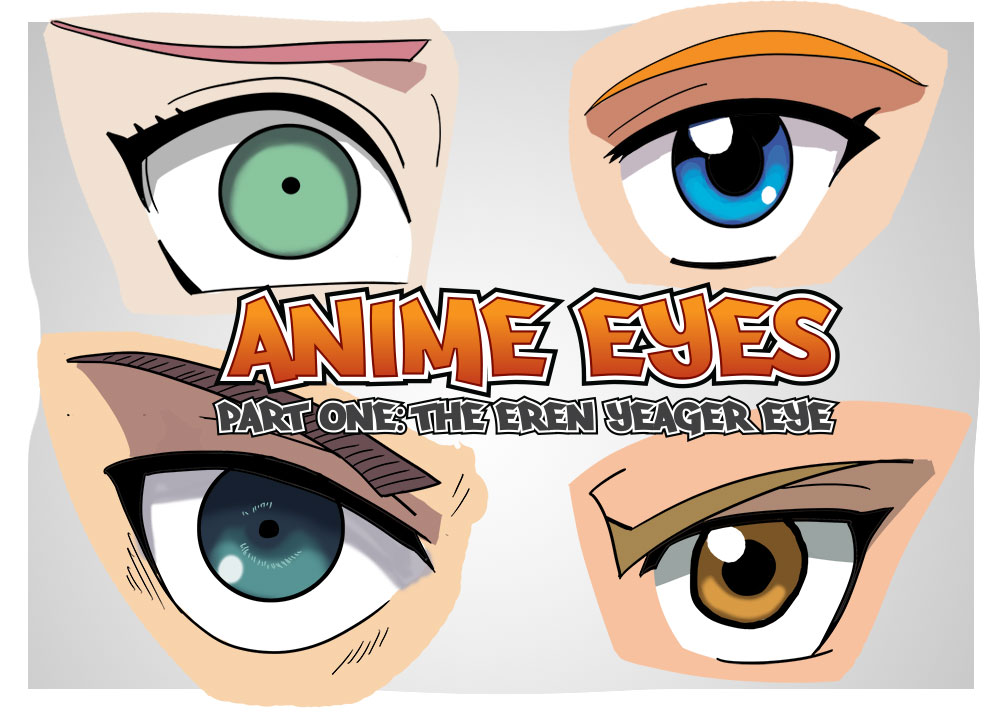
In Part 1 of the 4 part series I’ll be teaching you how to draw the eye of Eren Yeager from Attack on Titan. I’m sure you guys are familiar with the series.
Setting Up
First things first, before we get started, let’s make sure we have the correct canvas settings because I want to get you setup to give yourself the best chance of success throughout this tutorial.
Some of these settings will be determined by your graphics processing power that your computer currently has but the main point you need to take away is to draw at a high resolution with a high dpi and then resize when you want to export the image to the web or other mediums.
The reason for this is that when you re-size your image down to a lower resolution means that any minor mistakes in your lines, or general roughness, will hopefully somewhat disappear.
Canvas Settings
My settings are as follows
- 5000 x 5000 px canvas
- 600 dpi
However you may find that you can get away with 3000 x 3000 px and 300dpi if you’re computer can’t handle the settings above. If you use my settings you may start to get lag and jitter while you’re drawing. Depending on what you’re drawing too and how detailed your drawing is will determine with you need to reduce these settings significantly, at certain stages, to make sure your computer can keep up.
Brush Settings
Again I want you guys set up for success so I’ve listed out some different brush settings that I use at different stages.
Sketching
- 19px default hard brush
- “Transfer” is switched on in the Brush settings
Inking
- 19px default hard brush
- “Transfer” is switched off in the Brush settings
- 8-12px for final detail such as eyebrow strokes and wrinkles
Coloring Shadows
- 60-70px default soft brush
- “Transfer” is switched off in the Brush settings
In order for you to follow along successful in the steps below you might want to download the images from this site and open them into Photoshop. Once they’re open in Photoshop you can use the Eye Dropper tool to get the exact same colors that I’ve used. On that note, let’s get into the good stuff.
How to Draw the Eren Yeager Eye
Attack on Titan
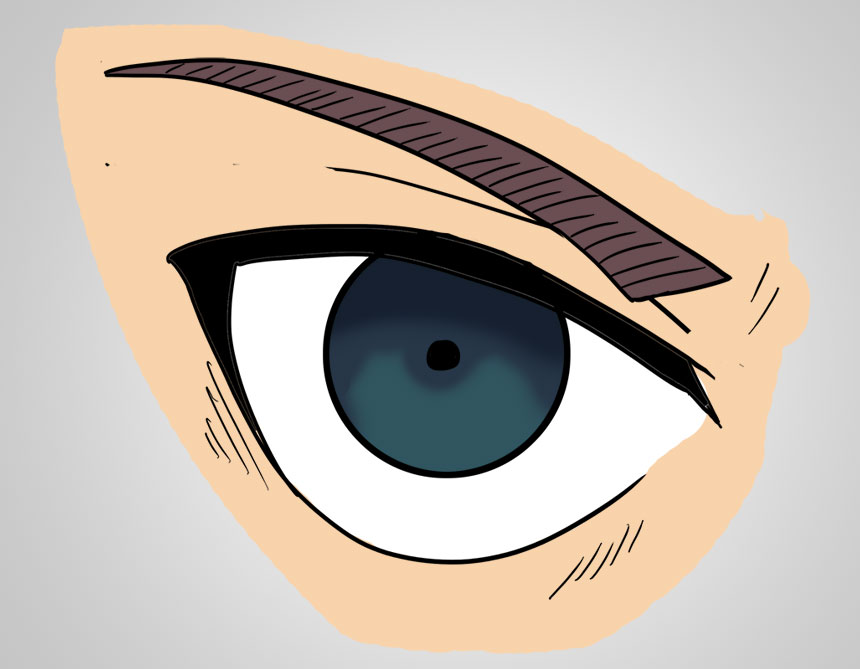
Sketch
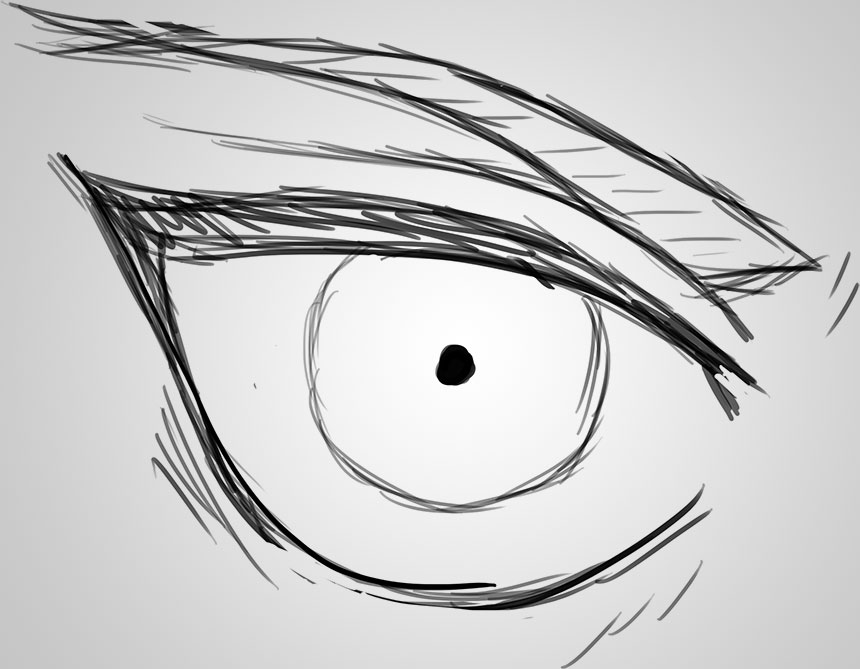
Eren Yeager Eye Sketch
I’m not going to go into step by step detail on how you sketch each of the eyes but instead provide you with my sketch instead. You can use it as your reference image if you like or find your own image of Eren’s eye to get started.
However, in order to draw Eren’s eye correctly you should watch out for a few key areas. Firstly the bottom of his eye is significantly curved. His eye brows are thin which typically signifies a younger character. His pupil is a small black dot in the middle of the iris.
To add some finishing touches to Erens eye you can add some of the wrinkle lines around his eye. For Eren’s eye I believe this is an important touch as it’s something that is a feature on his face throughout the Attack on Titan series. Doing this will make your final eye look more authentic
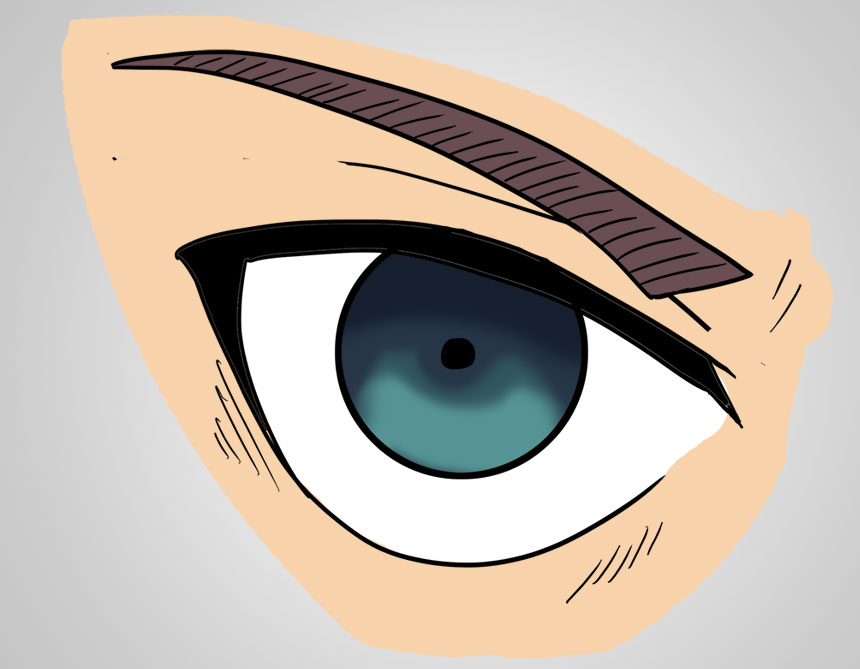
Ink
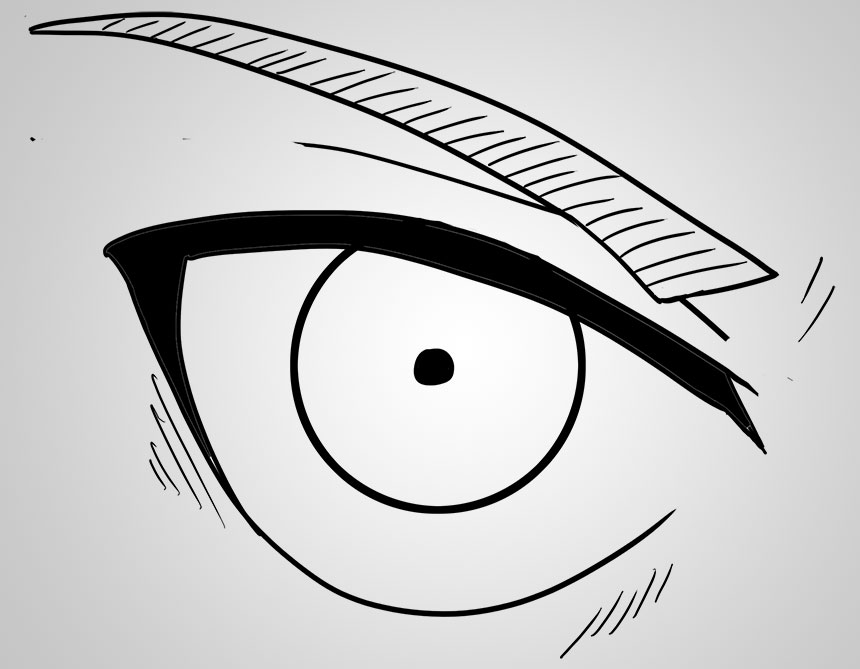
Inking The Eren Yeager Eye
There are two ways you can ink the eyes. The first method is to ink the lines free hand which is the method that I’ve used. If you use this method you’ll need to ensure that you remove the ‘Transfer’ setting from your brush stroke. You want to do this because it will give you solid black lines regardless of the pressure you apply which is what you want when you’re inking.
If you struggle with the freehand method for inking then you can use the Pen tool. Again how to use the Pen tool is out of scope for today’s tutorial but basically it involves plotting the points with the Pen Tool and adjusting the curves between the points. Once you’re happy with the curve right click on the line and select Stroke path.
If you like you can also use the eclipse tool, as I did, to create a perfectly formed iris. Create an ellipse using the Elliptical Marquee tool over the top of your sketched iris and then right click and stroke line again.
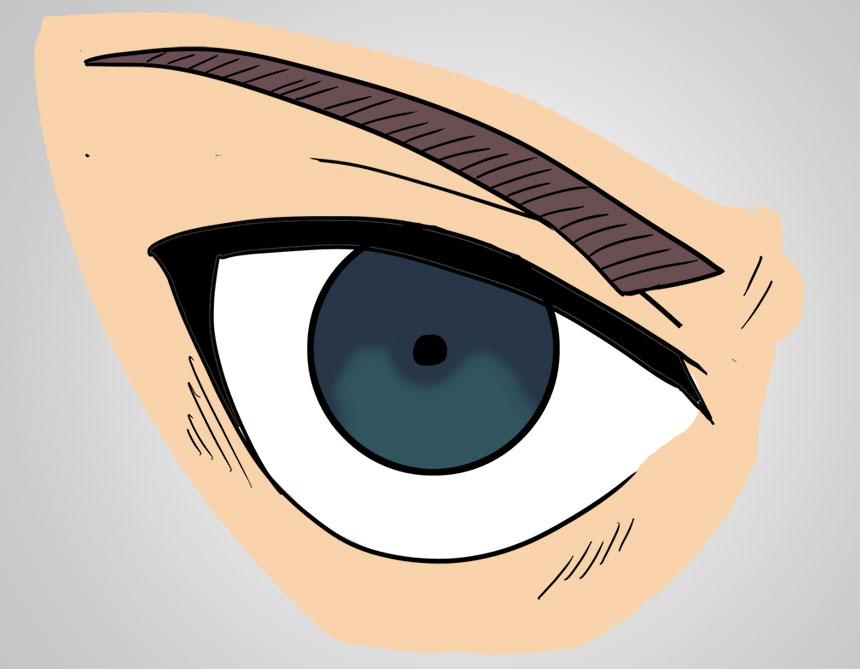
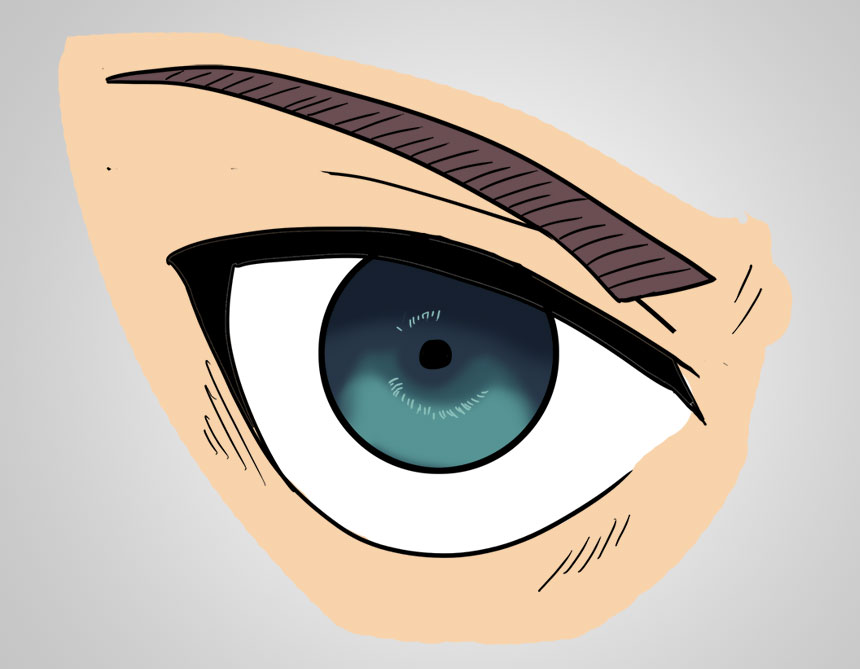
Flat Colors

Add Flat Colors
The next phase is to add your flat colors. In my case I added each of the colors on different layers because I wanted to show you how each layer was added for this tutorial. In your case you can put all of the flat colors on one layer if you like.
For example start with the Iris by selecting the magic wand tool and clicking the iris area. Once you have the circle selected create a new layer and call it ‘Flat Colors’. Before you color your selection make sure that you go to Select -> Modify -> Expand and expand your selection by 3px. This ensures that you don’t have any white left around your color.
For the skin and the white part of the eye you’ll need to color it in manually as you won’t be able to use the magic wand tool to select those particular areas. For example with the eye the black line doesn’t continue all the way, to make a fully enclosed area, so the magic wand would select far more than what you want.
Iris Shadow
Add Shadow to Iris
This is where it starts to get fun. Now that we have our flat colors we’re going to build up our eyes with shadows and highlights. At this point you can either create new layers for each additional color or you can add to your ‘Flat Color’ layer.
We want to make sure that we color within the chosen area and that our color doesn’t go outside of the lines. So go back to your ink layer, select the magic wand and select the Iris again. You can create a new layer, or select your ‘Flat color layer, and then select a soft brush instead of a hard brush. You can create a brush size of around 60-70px.
Now ensure that you have the outline of the iris selected (from the magic wand tool) and start brushing in the darker color to the top of the eye. The shadow goes around the bottom edge of the pupil too.
You should get a result similar to the image shown.
Darker Iris Shadow
Adding Darker Shadow
You might struggle to notice the difference between this screenshot and the last. However basically all I’ve done is grab a darker color than our original shadow and added another layer of shadow to the top part of the eye.
The shadow is an arc shape a few millimeters above the top of the pupil. Again I’m using the soft brush settings so that the two shadows will blend into each other. If you were to use a hard brush you’d be able to see a hard line between the darker shadow and the lighter shadow which would make the eye look unrealistic.
At the end of this stage you should have something that looks like the image shown. I hope you guys are keeping up OK?
Iris Lower Highlight
Adding lower highlight
Now it’s time to add your first highlight. With each of these steps you want to make sure that you have the iris selected using the magic wand tool, from your original ink layer, before you start coloring. This will make sure that your color continues to stay within the outlines of the inked Iris. I hope this make sense for you guys? There are a few ways of staying within your ink lines an this is just one method I use.
Select the lighter aqua color and with your soft brush start adding in the highlight in the bottom of the iris. In my image you can see that there are two lighter areas that I’ve shaded in. If you like you can change the opacity of your brush and do additional blending between the darker and the lighter color. I changed my opacity down to 25% and added in the lighter highlight too.
Add Iris Detail
Add Iris Detail
I’m not sure what this particular part of the eye is called however I selected a lighter color again and with a very fine brush (4-8px). I added in the lines in a circle around the pupil as shown in the image. The color is not quite white but its very close.
This is a very simple step where you just need to ensure that your brush size is really small and you might want to zoom right in on the eye to make it easy for you to see what you’re doing.
Again this level of detail is a key characteristic of Eren’s eye. Looking at my image for a second time it’s possible that you could also try a brighter color than I’ve used to add just a little bit extra ‘pop’ to your version. Just play around guys and find out what works best for you.
Secondary Highlight
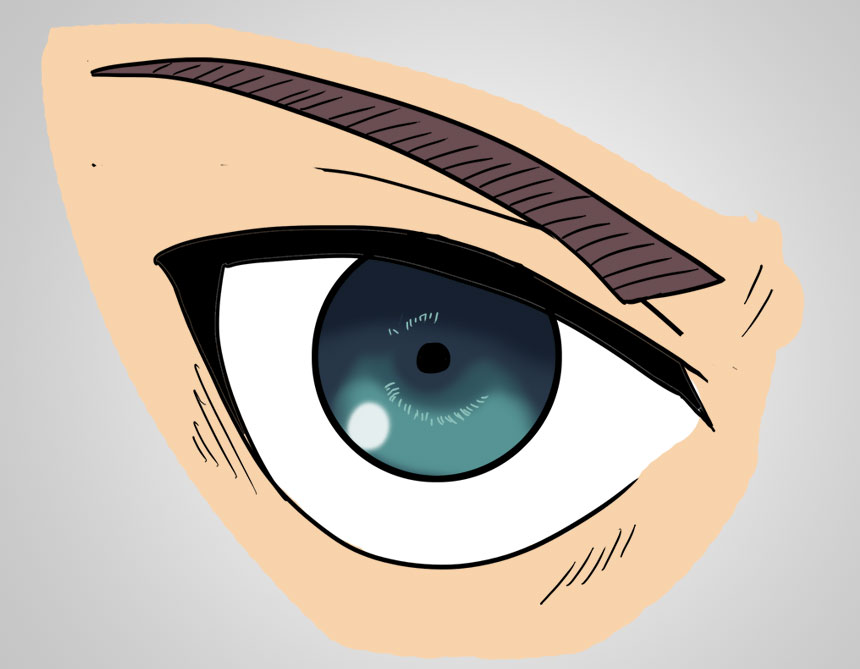
Add Secondary Highlight
This is where the eye really begins to ‘POP!’ guys. Again using your soft brush select White and then create a small circle of white in bottom left part of the Iris. It doesn’t have to go exactly there by the way and you could try putting it in different places with your own drawings.
Typically it depends on where your light source is coming from so I’ll let you play around with that more in the future. This really is a key factor in making your character feel alive. When I first started drawing I wasn’t adding this element into the eyes however when I found out the difference it made I use it every time to bring my characters to life.
So guys, make sure you use this in the future and see what kind of difference this makes to your drawings.
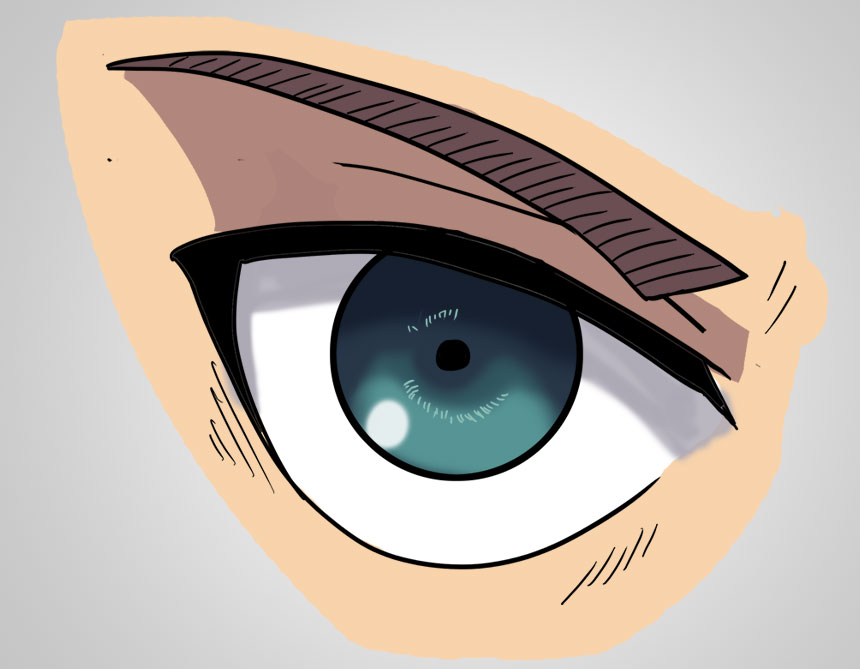
Eyebrow Shadow
Add Eyebrow Shadow
Heading into the final two stages now. Shading is really important when it comes to any part of our characters. You’ll be amazed and how realistic your character looks when you add shadow to key elements.
One area where I feel it’s absolutely key to your characters is shadow beneath the eyebrow and above the eye. This gives a better sense of depth and shows that the eyebrow comes out and over the top of the eyeball which creates a shadow in this area.
For the shadow I’ve used a hard brush instead of a soft brush as I personally like the look of the harder lines more. Feel free to experiment however and see what type of brush works best for you. If you wanted to blend this shadow with the skin color then you could try a softer brush and change the opacity levels too.
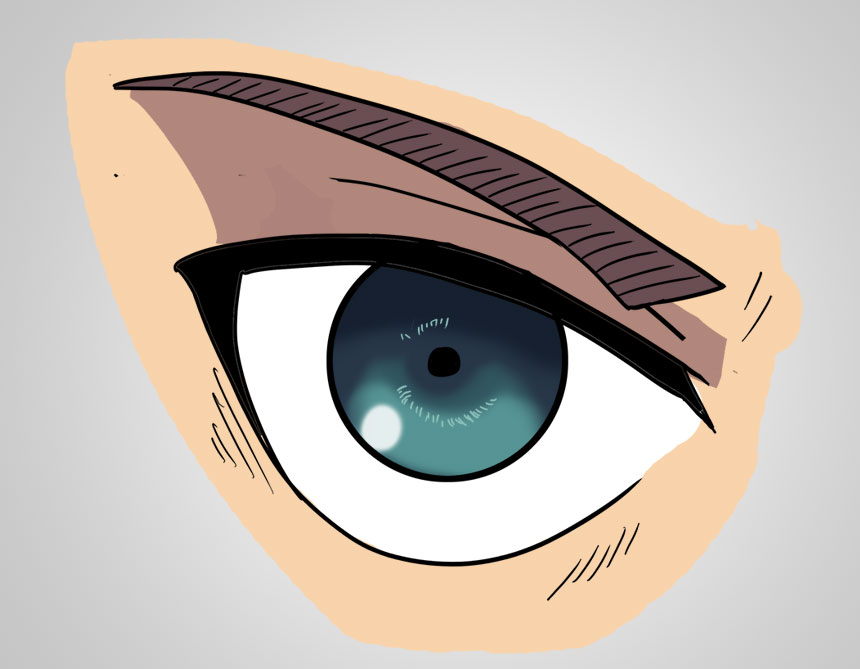
Shadow on the White of the Eye
Shadow To The White of Eye
The final step in creating Eren’s eye is to add shadow to the upper part of the white section of the eye (the Sclera I believe is the technical term). This again adds some additional depth to the eye and gives it the impressive that its slightly curved.
The eyeball curves into the head, or eye socket, as well as the highest part of it is beneath the eyebrow adding. All of these reasons mean we need to add some shadow to the top part of the white area to help us add another dynamic to the final version.
Once again I’ve used a harder brush to add this shadow in as I like the look of that more. However you could once again try using a brush with a softer edge and see what kind of affect that has on your final image.
Part 1 is Done!
I really hope that you can take away a few key points from this tutorial and that you can start drawing kick ass eyes for your own characters. I’d love to see some of your artwork, linked in the comments below, which shows your version of Eren’s eye too. If you don’t understand something then please fire away with your questions below and I’ll make sure I answer them quickly.
As I said earlier this is Part One of a massive Four Part series and I’ll be featuring one more male eye and two female eyes. So make sure you keep checking back and I’ll have more content for you as soon as I can get it out to you.
Which popular Anime characters do you think the other three eyes belong to? Put your comments below and see if you can pick them.
Want more?
Oh and one final point, some of you may know that I’ve created the Ultimate Cartoon Starter Kit and you guys get it free by signing up to the ToonsAnimeManga.com newsletter (featured below). I’ve uploaded my complete Photoshop file, for Drawing Anime Eyes, into the Ultimate Cartoon Starter Kit. So, if you want to get ahead of the rest or you simply want to play around and use them as ink and color practice then make sure you sign up and don’t miss out.
In the future if you want gain access to more awesome stuff, and see EXACTLY how I create things, then make sure you sign up and get access to the extra content..
[hero heading=”Join ToonsAnimeManga (It’s Free) ” tagline=”Receive your free Ultimate Cartoon Starter Kit, including the Anime Eye Photoshop File, and get free Blog updates.”][modal heading=”Join ToonsAnimeManga (It’s Free)” text=”I’m In” size=”btn-large” variation=”btn-danger”][/modal][/hero]
[…] Drawing Anime Eyes – Part 1: The Eren Yeager Eye […]
[…] Drawing Anime Eyes – Part 1: The Eren Yeager Eye […]
[…] Drawing Anime Eyes – Part 1: The Eren Yeager Eye […]
[…] Poses6160How To Draw Ninja Turtles Nickelodeon Style7150Mastering Manga with Mark Crilley8150Drawing Anime Eyes – Part 1: The Eren Yeager Eye9148Top 5 How to Draw Manga Channels on Youtube10143How To Draw Cartoons & Manga: A Beginners […]
[…] 5 How to Draw Manga Channels on Youtube8216Learn To Draw Cartoons With Kickass Poses9216Drawing Anime Eyes – Part 1: The Eren Yeager Eye10216How To Draw Cartoons & Manga: A Beginners Journey 61 views 0 likes 0 comments […]