
If you’ve arrived at this ultimate epic video guide then it means you and I have something in common, we both love Attack on Titan! AoT is absolutely EPIC and I can’t wait for season two to arrive. If you’re here however it means that you want to know How to Draw Eren Yeager(Jäger, Jaeger) and let me tell you, you’ve come to the right place!
First things first, throughout my tutorial I’ll refer to Eren as Eren Yeager, as shown in the official Shingeki No Kyojin Wiki, however the correct spelling is Eren Jäger. A number of people commented about this on my video and I wanted to make sure there was no confusion and most of all, I agree with what they say.
This epic video guide is split into two parts, the first part shows you how to sketch and ink and the second part will show you how to color Eren. Throughout the videos I’ll be giving you all my tips and tricks from how to position the elements of the face all the way through to adding shadows and highlights to your artwork.
If you want further detail on how to draw Anime eyes then be sure to check out my Four Part series starting with Part 1 Drawing Anime Eyes: The Eye of Eren Yeager. Don’t forget to subscribe to my YouTube channelso you’ll know when I release more awesome tutorials like this one.
Let’s get started..
How To Position Facial Elements
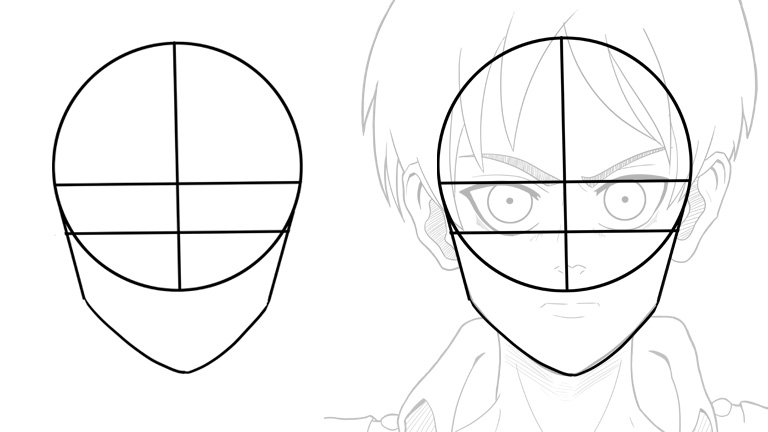
One of the questions I was asked about on YouTube was “How did I put together the frame of the face?” as shown at the beginner of Part One. I’ve created a new image (shown below) on the basic concept behind creating a face. The first part of drawing a face starts with a circle for the top part of the skull.
It doesn’t matter which direction the head is facing as generally the top part of the skull will always be round. However depending on which direction the head is facing will determine how we need to position the other elements of the face such as the jaw. As my version of Eren is facing directly towards the camera we simple draw a circle and then add in the Jaw as shown below.
We then cut the circle into equal quarters and half the bottom half of the circle again. These guidelines are a general recommendation for where the eyes might be placed. The remaining elements depend on the character you are drawing but typically the nose is placed two centimeters below the eyes and the mouth about a centimeter below the nose.
Hopefully this image will assist you with positioning the elements on your version of Eren.
How To Draw Eren – Facial Construction
How To Draw Eren Yeager (Jäger, Jaeger)
Part One – Sketching & Inking
Part One of the How To Draw Eren Yeager (Jäger, Jaeger) series focuses on sketching and inking. I show you how to position the elements of Eren’s face including tips and tricks for problem areas such as hair. I detail my brush settings and how I convert my original sketch into a clear and crisp inked version.
How To Draw Eren Yeager (Jäger, Jaeger)
Part Two – Coloring
Part Two continues on, from Part One, and I show you exactly how to add color to your ink lines. We discuss how you can add shadows and highlights to areas such as the skin, eyes, and hair and different methods for how this can be achieved within Photoshop. This is the fun part guys as you get to bring your character to life by adding amazing colors and details.
The Color Chart
As promised, in Part 2 of the How To Draw Eren Yeager video series, you’ll find the color palette I used to color Eren. If you want to follow along with the video series and try to color your own version of Eren then I’ve listed each of the individual colors that I used. All you need to do is the following:
a) Save the image below and then use the color picker in Photoshop to grab the colors
b) use the code that I’ve listed and copy that into your drawing application to find the right color.
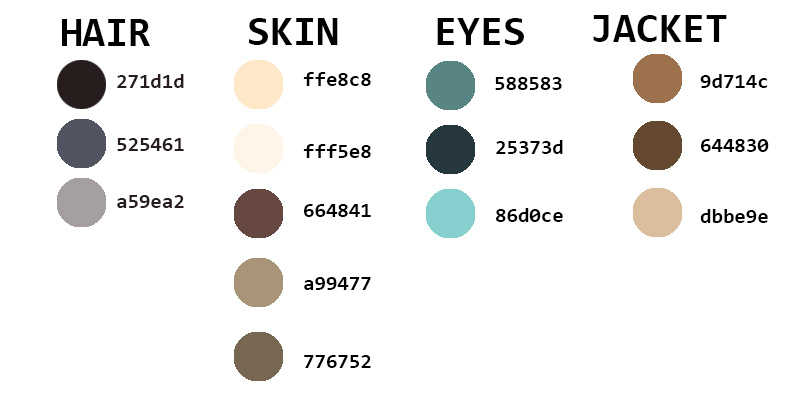
How To Draw Eren Yeager – Color Chart
Future Improvement
I received heaps of great feedback on this piece of artwork for which I hope will really improve any future pieces of artwork that I create. I thought I’d share some of those comments with you guys too so that you can benefit from what others have told me. You know sometimes all you want is compliments when it comes to your drawings, especially when you’re learning, but the fact is that sometimes you need things to be pointed out to you in order for you to improve.
So here are some of the areas that I can improve on for next time:
- Create more separation between the two eyes. A general rule is to have one eye’s width of separation between the two eyes
- The neck should be slightly wider
- The ears should be lower
- The jaw should be more tapered
- The Ink lines for the eyes should be even and equal thickness
- The eye brows should be thicker.
Overall the feedback was really positive, for my artwork, but as always there are little things that we can learn and improve on for the next piece. Thanks to everyone for their critique and encouraging support for my journey.
That brings me to the end of this Epic How To Draw Eren (Jäger, Jaeger) video post and now it’s time to think about the next video series I’ll bring your way. Make sure you post a link to your version of Eren in the comments below and shout out any questions you have when you’re creating your version.
Thanks so much for taking the time to write this post – I found not only was it helpful but my drawing turned out heaps better than I expected! Keep up the awesome work!
Thanks so much Jesse. Makes me happy to hear that I’ve helped you in some way and that your art is improving! That’s what it’s all about here, make sure you keep stopping by for new tutorials.
This was a really useful guide! I’ve only been drawing for approx 26 days (I started learning on 30th April 2014, having never drawn before), and SNK is something I really want to learn how to do well.
It was really interesting seeing how you got the symmetry you wanted (eyes are a big problem for me!), I’m gonna try these tips and see how it turns out! 🙂 thanks for posting!
Quick question if you don’t mind answering: could you explain how you did the circles of Eren’s eyes? I tried in PhotoShop CS4 to get circles, but they always fill in rather than draw an outline. Could you talk through that step please? 🙂
Hi Rachel,
Thanks so much for the comments, you know you and i sound very similar. I didn’t start drawing until I was 28. I built this website to motivate people like yourself to keep pushing to reach your goals! Join up to the community too if you like, it’s so much fun. In photoshop, i start a new layer below the eyebrows etc then I create a circle with the elliptical tool, press M, create the circle for the size I want. Right click and go “stroke” select the stroke length you want, I usually play around with that, and then press ok. Simple as that. After that I go and erase the parts of the circle that I don’t want to see because the eyebrow is covering etc.
Ok so here’s my version. Bit different to yours hahaha >.< https://31.media.tumblr.com/e39df9f6f7efc266b7ed01ad11df9011/tumblr_n64zcwrBPk1taylk2o1_500.png
Really great job Rachel, you should be proud of your efforts. It’s great to see some artwork that is based on my own! thanks so much for sharing.
This is a very helpful tutorial. Outstanding work, Byron. I didn’t use the application you used to color in Eren, I did it with pencils and supplies like that. The chart however, helped me a lot because I used it to decide which pencils to use. It gave me a reference. Again, this is very good, and thank you. -Megan
Thanks so much Megan. Would love to see a photo of your drawing feel free to post it or show it to us in the forums. It’s always great to hear that you found my tutorial really helpful.